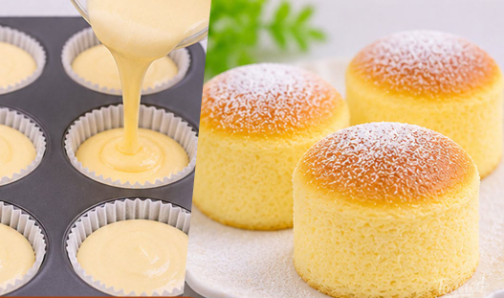
| Prep Time | 25 minutes |
| Bake Time | 35 minutes |
| Cooling & Chilling Time | 1 hour 30 minutes |
| Total Time | 2 hours 30 minutes |
| Yield | 6 Mini Cheesecakes (using a standard 6-cup jumbo muffin pan or 3.5-inch ramekins) |
| Difficulty / Intensity | Moderate (Medium Intensity) — Requires precise meringue whipping and water-bath baking |
| Oven Temperature Intensity | Two-Stage Gentle Heat: Starts at 320°F (160°C) for lift, drops to 285°F (140°C) for even setting |
Why This Mini Version Works Every Time
Traditional 8-inch Japanese cotton cheesecakes are notorious for collapsing or splitting down the middle if the oven heat fluctuates by even a few degrees. Scaling the recipe down into individual mini cakes solves three major baking headaches:
-
Faster, Even Heat Distribution: Smaller volumes of batter allow heat from the water bath to penetrate to the center quickly, preventing a wet, underbaked core while keeping the exterior pale golden.
-
Built-In Portion Control: Each cake comes out with its own smooth, domed top ready for dusting with powdered sugar or topping with fresh berries.
-
Superior Structural Stability: Individual parchment collars support the batter as it rises, giving you tall, bakery-worthy soufflé tops that hold their shape after cooling.
Ingredients
For the best rise and silky texture, bring your cream cheese, milk, and eggs to room temperature before beginning, then separate the eggs while they are still slightly cool for cleaner separation.
Cream Cheese Base
-
150 g (5.3 oz) full-fat block cream cheese, softened to room temperature
-
35 g (2.5 tbsp) unsalted butter, room temperature
-
75 ml (5 tbsp) whole milk, room temperature
-
3 large egg yolks, room temperature
-
1 tsp pure vanilla extract
-
1/2 tsp fresh lemon juice (brightens the dairy flavor and stabilizes the batter)
-
30 g (1/4 cup) cake flour, sifted (or 25 g all-purpose flour + 5 g cornstarch)
-
10 g (1 tbsp + 1 tsp) cornstarch, sifted
Meringue
-
3 large egg whites, cold or room temperature, completely free of yolk traces
-
1/4 tsp cream of tartar (or an extra 1/4 tsp lemon juice)
-
60 g (1/4 cup + 1 tbsp) granulated caster sugar (superfine sugar dissolves fastest)
-
1 pinch fine sea salt
Garnish (Optional)
-
1 tbsp confectioners’ sugar (powdered sugar) for dusting
-
Fresh raspberries, blueberries, or mint leaves for serving
Step-by-Step Instructions
Stage 1: Pan Preparation & Water Bath Setup (Intensity: Low)
-
Line the Molds: Lightly grease six cups of a jumbo muffin tin or six 3.5-inch (9 cm) ramekins with butter. Cut six circles of parchment paper to fit the bottoms, and six long strips of parchment paper (about 3.5 inches tall) to line the inner walls. The paper should extend at least 1 inch above the rim of each cup to guide the batter as it rises.
-
Prepare the Water Bath: Place your lined muffin tin or ramekins inside a deep roasting pan. Boil a kettle of water so it is ready to pour once the batter is filled.
-
Preheat the Oven: Position an oven rack in the lower-middle third of your oven and preheat to 320°F (160°C) (conventional bake setting; avoid convection fan if possible, as direct airflow can crack the tops).
Stage 2: Making the Silky Cream Cheese Batter (Intensity: Low-Medium)
-
Melt the Dairy Base: Set a heatproof mixing bowl over a pot of barely simmering water (double boiler method), ensuring the bottom of the bowl does not touch the water. Add the softened cream cheese, unsalted butter, and whole milk. Whisk gently until completely smooth, glossy, and free of lumps. Remove from heat.
-
Enrich with Yolks: Allow the mixture to cool for 2 minutes so it is warm rather than hot. Whisk in the egg yolks one at a time until fully incorporated, followed by the vanilla extract and lemon juice.
-
Sift in the Dry Ingredients: Sift the cake flour and cornstarch directly over the warm cream cheese mixture. Whisk smoothly in a circular motion just until no dry flour pockets remain. Do not overmix, as excess gluten development makes the cake chewy instead of cotton-soft. Set aside.
Stage 3: Whipping the Meringue & Folding (Intensity: High — Precision Step)
-
Start the Foam: In a spotlessly clean, grease-free glass or metal bowl, beat the egg whites, salt, and cream of tartar on medium speed using a hand mixer or stand mixer until frothy and opaque with tiny bubbles.
-
Reach Soft-to-Medium Peaks: Gradually add the granulated sugar in three additions, beating for about 20 seconds between each addition. Increase mixer speed to medium-high and whip until the meringue reaches firm-soft peaks (also known as “bird’s beak” stage): when you lift the beaters, the meringue holds its shape, and the tip curls over gently like a hook rather than standing rigidly straight. Tip: Stiff, dry peaks will break apart during folding and cause cracks during baking.
-
Temper and Fold: Scoop one-third of the meringue into the cream cheese base and whisk gently to lighten the batter. Pour this lightened mixture back into the remaining meringue bowl. Using a wide silicone spatula, fold with a gentle J-stroke—cutting down the center, sweeping along the bottom, and folding over the top while rotating the bowl—until the batter is uniform, pale yellow, and airy with zero white streaks.
Stage 4: Two-Stage Steam Baking & Cooling (Intensity: Medium)
-
Fill and Tap: Divide the batter evenly among the six parchment-lined molds, filling each about three-quarters full. Gently tap the pan on the counter twice to release trapped large air pockets.
-
Bake Stage One (High Lift): Pour hot water into the outer roasting pan until it reaches halfway up the sides of the muffin cups or ramekins. Carefully transfer the roasting pan to the oven and bake at 320°F (160°C) for 15 minutes until the cakes puff up and develop a light golden crown.
-
Bake Stage Two (Gentle Set): Without opening the oven door, reduce the temperature to 285°F (140°C) and bake for an additional 20 minutes until the cakes are set, spring back lightly when touched, and a skewer inserted into the center comes out clean with a few moist crumbs.
-
Gradual Oven Rest: Turn off the oven, crack the oven door open by about 2 inches (wedge a wooden spoon in the door if needed), and let the cheesecakes rest inside for 15 minutes. This prevents thermal shock and keeps the cakes from deflating rapidly.
-
Cool and Serve: Remove the roasting pan from the oven, lift the molds out of the water bath, and let the cakes cool on a wire rack for 20 minutes before peeling away the parchment collars. Enjoy warm for a molten soufflé experience, or chill in the refrigerator for 1 hour for a classic, velvety Japanese bakery texture. Dust with powdered sugar right before serving.
Storage and Make-Ahead Tips
-
Refrigeration: Store cooled Mini Japanese Cotton Cheesecakes in an airtight container in the refrigerator for up to 4 days. Let them sit at room temperature for 10 minutes before eating to restore their signature bounce.
-
Freezing: Wrap individual un-garnished cheesecakes tightly in plastic wrap and place them in a freezer-safe bag for up to 1 month. Thaw overnight in the fridge.
Nutrition Information
Nutritional values are estimated per 1 Mini Japanese Cotton Cheesecake (1/6 of the total recipe, excluding optional fruit toppings).
| Nutrient | Amount per Serving | % Daily Value* |
| Calories | 215 kcal | 11% |
| Total Fat | 14.2 g | 18% |
| Saturated Fat | 8.4 g | 42% |
| Trans Fat | 0.3 g | — |
| Cholesterol | 135 mg | 45% |
| Sodium | 145 mg | 6% |
| Total Carbohydrates | 16.5 g | 6% |
| Dietary Fiber | 0.2 g | 1% |
| Total Sugars | 11.4 g | — |
| Added Sugars | 10.0 g | 20% |
| Protein | 5.4 g | 11% |
| Calcium | 48 mg | 4% |
| Iron | 0.6 mg | 3% |
| Potassium | 78 mg | 2% |
