| Prep Time | 10 minutes (active) |
| Inactive Time | 45–60 minutes (bringing butter to room temperature) |
| Total Time | 10 minutes (once butter is softened) |
| Recipe Intensity | Beginner / Easy (No-Cook) |
| Equipment Intensity | Low (Stand mixer or hand mixer required) |
| Yield | Approximately 1 ½ cups (12 ounces / 24 tablespoons) |
Why This Recipe Works
-
True Aeration: Whipping butter on medium-high speed incorporates microscopic air pockets into the milk fats. This increases the volume of the butter by nearly fifty percent, creating an ultra-light texture that spreads cleanly over delicate pastries without tearing them.
-
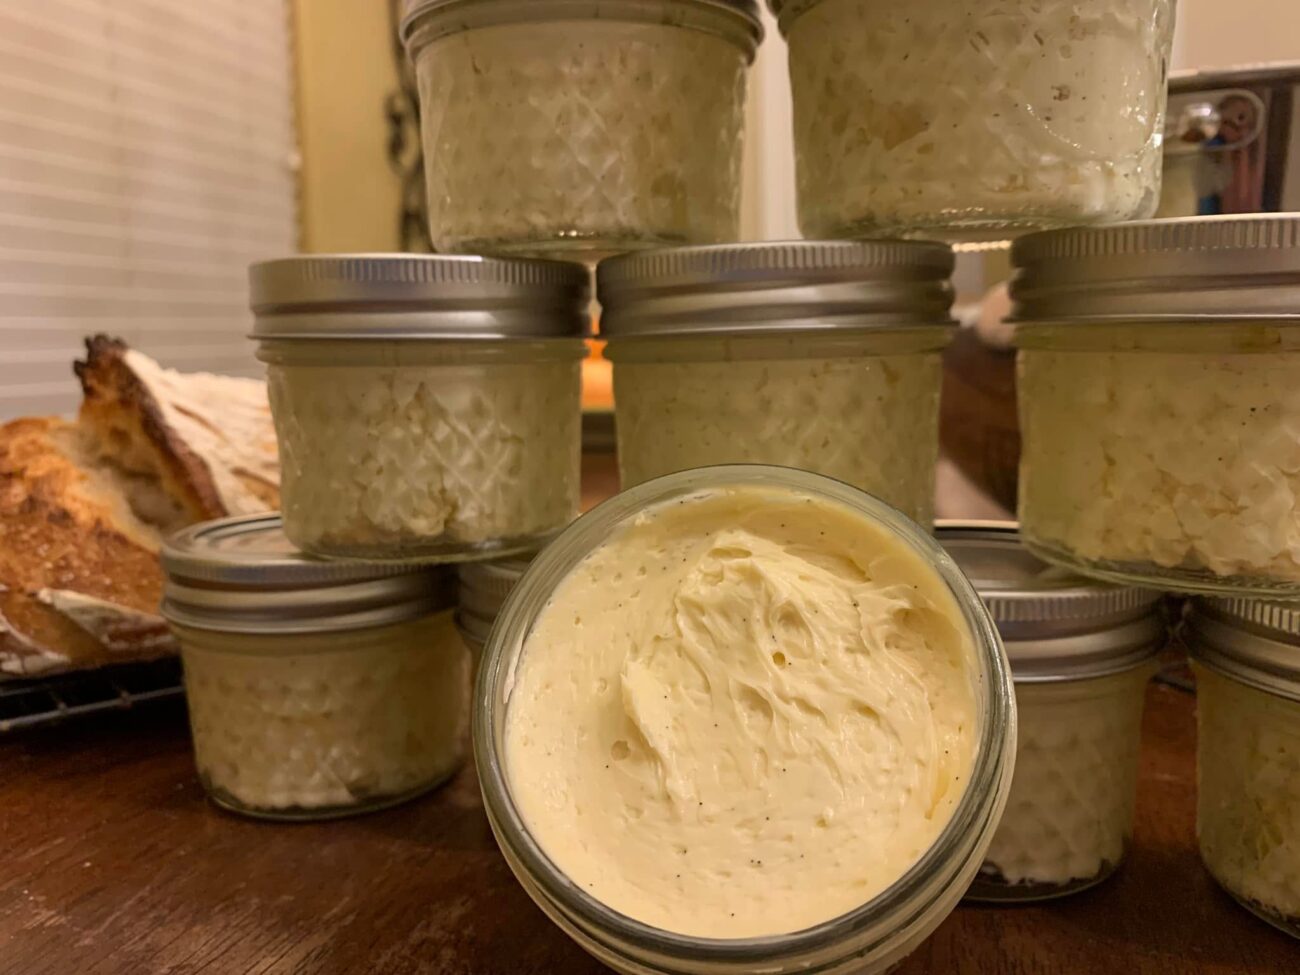
Real Vanilla Bean Caviar: Using a whole vanilla bean pod rather than just liquid extract infuses the fat with complex, woody, and floral aromatic compounds. Furthermore, the visual appeal of the tiny black vanilla specks suspended in pale golden butter makes the spread look like it came straight from an upscale bakery.
-
Balanced Sweetness and Salinity: Honey provides deep floral sweetness, while a pinch of flaky sea salt cuts through the richness of the dairy and prevents the spread from tasting overly sugary.
-
Emulsification Stability: Adding the honey slowly while the mixer is running ensures that the liquid honey emulsifies cleanly into the butterfat rather than pooling at the bottom of the bowl.
Ingredients You Will Need
To achieve the best possible flavor and texture, choose the highest-quality ingredients you can find. Because there are no spices or heavy cooking processes to mask the base flavors, the quality of your butter and honey will shine right through.
-
1 cup (2 sticks / 226 grams) unsalted butter, softened to room temperature: European-style butter (such as Kerrygold, Plugrá, or Vital Farms) is strongly recommended here. European butters are churned longer to achieve a higher butterfat content—typically 82% to 85% compared to the standard 80% in American butter. This extra butterfat yields a richer flavor, deeper yellow color, and silkier whip.
-
¼ cup (85 grams) pure, runny honey: Wildflower, clover, or orange blossom honey all work beautifully. Ensure your honey is liquid and pourable; if it has crystallized, warm the jar gently in a bowl of hot water for five minutes and let it cool slightly before using.
-
1 whole plump vanilla bean pod (Grade A): Look for a pod that feels supple, moist, and flexible rather than dry or brittle. Substitution note: If you do not have a whole vanilla bean on hand, you may substitute 1 ½ teaspoons of pure vanilla bean paste or 1 teaspoon of pure vanilla extract.
-
¼ teaspoon flaky sea salt (such as Maldon), plus extra for garnish: If using fine table salt instead of flaky sea salt, reduce the amount to a scant ⅛ teaspoon so the butter does not become overly salty.
Step-by-Step Instructions
Step 1: Soften the Butter Properly
Remove the two sticks of unsalted butter from the refrigerator 45 to 60 minutes before you plan to begin. The butter should be at a true room temperature of roughly 65°F to 68°F (18°C to 20°C). When you press your finger gently into the stick, it should leave a clear indentation without feeling greasy, shiny, or melted. If the butter is too cold, it will clump and refuse to whip smoothly; if it is overly warm or partially melted, it will not hold air and will remain flat.
Step 2: Scrape the Vanilla Bean
Place your whole vanilla bean pod flat on a clean cutting board. Using the tip of a sharp paring knife, slice the pod lengthwise down the center from top to bottom, splitting it open to expose the aromatic interior. Hold one end of the pod steady and use the flat back edge of your knife blade (not the sharp cutting edge) to firmly scrape down the length of both halves, gathering the thick, dark paste of vanilla seeds onto the blade. Set the scraped seeds aside and save the empty vanilla pod to tuck into a jar of granulated sugar to make homemade vanilla sugar.
Step 3: Whip the Base Butter
Place the softened butter into the bowl of a stand mixer fitted with the whisk attachment (or use a large mixing bowl with a handheld electric mixer). Beat the butter on medium-high speed for 3 to 4 minutes. Stop the mixer halfway through to scrape down the sides and bottom of the bowl with a flexible silicone spatula. You want the butter to transform from a dense yellow block into a pale, creamy, and noticeably airy mass before adding any other ingredients.
Step 4: Incorporate Honey, Vanilla, and Salt
Turn the mixer speed down to medium-low. Slowly drizzle the honey down the inside edge of the bowl while the beaters are moving, allowing it to incorporate gradually into the whipped butter. Add the scraped vanilla bean seeds and the flaky sea salt. Once all ingredients are in the bowl, scrape down the sides once more, then increase the mixer speed back to medium-high and whip for another 1 to 2 minutes. The finished butter should look fluffy, smooth, and completely uniform with vanilla specks evenly distributed throughout.
Step 5: Serve or Store
Transfer the whipped butter into a decorative serving ramekin or glass crock using a spatula to create attractive swoops and swirls on top. Finish with a light scattering of extra flaky sea salt and, if desired, a tiny drizzle of honey right before bringing it to the table.
Serving Suggestions
This versatile compound butter pairs effortlessly with both sweet breakfast staples and savory comfort foods:
-
Freshly Baked Breads: Slather generously over warm sourdough toast, crusty French baguettes, cornbread muffins, buttermilk biscuits, or freshly baked dinner rolls.
-
Breakfast Classics: Top stacks of fluffy pancakes, crisp Belgian waffles, French toast, or warm cinnamon rolls while they are still hot from the griddle or oven.
-
Roasted Vegetables: Melt a tablespoon over roasted sweet potatoes, glazed carrots, or baked acorn squash for an instant sweet-and-savory side dish.
-
Charcuterie and Brunch Boards: Serve in a small ceramic dish surrounded by sliced apples, pears, figs, toasted pecans, and crusty artisan crackers.
Storage, Shelf Life, and Make-Ahead Tips
Because this recipe blends dairy fat with natural honey—which has natural antimicrobial properties—it keeps well, though proper storage is essential to maintain its airy texture.
-
Room Temperature Storage (Short-Term): If your kitchen is cool (below 70°F / 21°C), you can keep the whipped butter covered at room temperature in an airtight container or butter bell for up to 2 days. This keeps it immediately spreadable for daily breakfast service.
-
Refrigerator Storage (Up to 2 Weeks): For longer storage, transfer the butter to an airtight glass jar or sealed container and refrigerate for up to 2 weeks. Keep in mind that chilling will cause the butter to firm up solidly. To restore its soft, spreadable consistency, take the jar out of the fridge 30 to 45 minutes before serving. If you want to restore the ultra-fluffy whipped volume after refrigeration, let it soften to room temperature and re-whip it with a hand mixer for 60 seconds.
-
Freezer Storage (Up to 3 Months): You can freeze whipped honey butter in a freezer-safe airtight container for up to 3 months. Thaw it overnight in the refrigerator, then bring it to room temperature on the counter before serving.
Nutritional Information
The nutritional values below are estimates calculated per 1 tablespoon (approximately 13 grams) serving, based on a total yield of 24 tablespoons using European-style unsalted butter and pure wildflower honey.
| Nutrient | Amount per Serving (1 Tbsp) | % Daily Value* |
| Calories | 78 kcal | 4% |
| Total Fat | 7.6 g | 10% |
| Saturated Fat | 4.8 g | 24% |
| Trans Fat | 0.3 g | — |
| Cholesterol | 20 mg | 7% |
| Sodium | 24 mg | 1% |
| Total Carbohydrates | 2.9 g | 1% |
| Dietary Fiber | 0 g | 0% |
| Total Sugars | 2.8 g | — |
| Added Sugars | 2.8 g | 6% |
| Protein | 0.1 g | 0% |
