| Metric | Details |
| Prep Time | 2 minutes |
| Cook Time | 35 minutes |
| Cooling Time | 30 minutes |
| Total Time | 1 hour 7 minutes |
| Skill Intensity | Easy (Beginner-Friendly) |
| Heat Intensity | Medium-Low to Low Simmer |
| Attention Intensity | Moderate (Requires periodic stirring to prevent scorching) |
| Yield | 1 ¼ cups (approx. 14 oz / 396g — equivalent to one standard can) |
Why Make Sweetened Condensed Milk from Scratch?
Commercial sweetened condensed milk is simply cow’s milk from which roughly 60% of the water has been evaporated, with sugar added to sweeten and preserve it. By replicating that exact evaporation process in a wide saucepan at home, you gain complete control over your ingredients.
-
Superior Flavor: Fresh whole milk develops subtle, natural caramelized dairy notes as it reduces, making your desserts taste noticeably richer.
-
Zero Additives: No gums, stabilizers, or preservatives—just pure milk and sugar (plus optional butter and vanilla for extra silkiness).
-
Exact Quantities: Need half a can for iced coffee or a single batch of caramel? You can easily scale this recipe up or down so nothing goes to waste in the back of your refrigerator.
-
Cost-Effective: Using everyday milk and sugar you already keep on hand saves money compared to specialty baking aisle cans.
Ingredients You Will Need
-
2 cups (480 ml) whole milk: Whole milk (at least 3.25% milkfat) is essential for achieving that signature rich body and creamy mouthfeel. Avoid skim or low-fat milk, as they lack the fat solids needed for proper thickening.
-
⅔ cup (135 g) granulated white sugar: Sugar provides sweetness, helps stabilize the milk proteins during heating, and creates the thick, syrupy viscosity as the water evaporates.
-
2 tablespoons (28 g) unsalted butter (optional): Stirring in butter at the very end gives the condensed milk an extra-glossy sheen and ultra-velvety texture, closely mimicking canned varieties.
-
½ teaspoon pure vanilla extract (optional): Adds warm bakery aroma; omit if using the condensed milk for savory-sweet glazes or recipes where pure dairy flavor is preferred.
Step-by-Step Instructions
-
Combine Milk and Sugar (Low Heat Intensity): Pour the 2 cups of whole milk and ⅔ cup of granulated sugar into a heavy-bottomed medium saucepan or wide sauté pan. A wider pan increases surface area, allowing water to evaporate faster and more evenly. Place the pan over medium-low heat and whisk gently until the sugar completely dissolves into the milk—this takes about 3 to 4 minutes. Do not let the mixture boil vigorously while the sugar is still dissolving.
-
Bring to a Gentle Simmer (Medium-Low Heat Intensity): Once the sugar has fully dissolved and no grit remains at the bottom of the pan, increase the heat slightly just until tiny bubbles form around the edges of the milk. Immediately reduce the heat to low so the mixture maintains a gentle, steady simmer.
-
Reduce the Mixture (Low Heat / Moderate Attention Intensity): Allow the milk to simmer uncovered for 30 to 35 minutes. Stir every 3 to 4 minutes with a heatproof silicone spatula, making sure to scrape along the bottom and corners of the pan so the milk solids do not stick or scorch. If a thin skin forms on the surface, simply whisk or stir it back into the liquid.
-
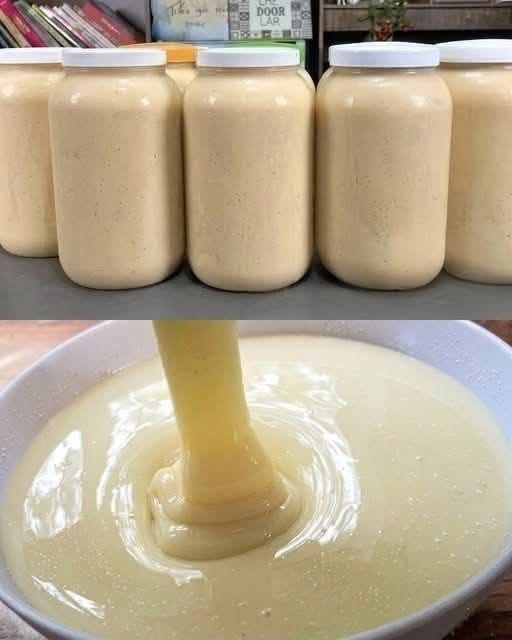
Watch for Visual Cues: As the water evaporates, the milk will reduce by roughly half, shifting from bright white to a warm, pale ivory or light cream color. It will visibly thicken and coat the back of a spoon smoothly. Keep in mind that the mixture will continue to thicken substantially as it cools, so stop cooking while it is still slightly thinner than store-bought condensed milk (similar to warm heavy cream or thin maple syrup).
-
Finish and Cool: Remove the saucepan from the heat. If using, add the 2 tablespoons of unsalted butter and ½ teaspoon of vanilla extract, stirring continuously until the butter melts completely and emulsifies into a glossy, smooth sauce.
-
Strain and Store: For an ultra-silky, lump-free finish, pour the warm condensed milk through a fine-mesh strainer directly into a clean glass mason jar. Let it cool to room temperature uncovered (about 30 minutes) before sealing with a lid and refrigerating.
Pro Tips for Foolproof Results
-
Choose the Right Pan: Thin aluminum pans create hot spots that scorch milk sugars quickly. Always reach for a heavy-bottomed stainless steel, enameled cast iron, or thick nonstick saucepan.
-
Never Boil Rapidly: High heat causes milk proteins to curdle and boil over in seconds. Patience on a low simmer guarantees a smooth, custard-like emulsion without grainy bits.
-
Adjusting Thickness: If your condensed milk becomes overly thick after chilling in the fridge, simply warm it gently for 10 to 15 seconds or whisk in 1 to 2 teaspoons of warm milk until it loosens to your desired consistency.
Storage & Shelf Life
Properly stored, Homemade Sweetened Condensed Milk keeps beautifully in the refrigerator and freezer:
-
Refrigerator: Transfer the cooled condensed milk to an airtight glass jar or container. It will stay fresh in the fridge for up to 2 weeks. Always use a clean spoon when scooping to prevent introducing bacteria.
-
Freezer: Pour into a freezer-safe container or silicone ice cube tray (leaving ½ inch of headspace for expansion) and freeze for up to 3 months. Thaw overnight in the refrigerator and stir well before using in baking recipes.
Nutrition Information
Serving Size: 2 tablespoons (approx. 38g) | Servings per Recipe: 10
| Nutrient | Amount per Serving | % Daily Value* |
| Calories | 105 kcal | 5% |
| Total Fat | 3.8 g | 5% |
| Saturated Fat | 2.4 g | 12% |
| Cholesterol | 14 mg | 5% |
| Sodium | 22 mg | 1% |
| Total Carbohydrates | 15.8 g | 6% |
| Dietary Fiber | 0 g | 0% |
| Total Sugars | 15.8 g | — |
| Protein | 1.6 g | 3% |
| Calcium | 58 mg | 4% |
